25 February, 2016

Get Rs 50 Cashback On Adding Rs 500 Paytm Rupay

Get Rs 50 Cashback On Adding Rs 500 Paytm Rupay


Paytm Rupay Debit Card Offer – Get Rs 50 cashback on adding Rs 500 in paytm wallet using rupay debit card. You will get 10% cashback on adding money in paytm wallet. Offer can be availed by all users and offer can be used only once by a user.

How To Get Rs 50 Cashback On Adding Rs 500 In Paytm Wallet :

1) Go to Paytm Website From Here
2) Login or signup
3) Initiate adding Rs 500 in paytm wallet
4) Enter your details
5) Proceed to payment page and apply promo code :- 50RUPAY
5) Pay the amount using rupay debit card and complete your transaction.
You will get Rs 50 cashback within 24 hours in your paytm wallet.

Terms & Conditions :

1) Add Rs. 500 or above using Rupay Debit card & get Rs. 50 cashback in your Paytm wallet.
2) Applicable for RuPay debit card transactions only. No other card will be eligible for this offer.
3) Applicable for only Adding money in Paytm Wallet.
4) Promo code can be used one time per customer, per card, per calendar month.
5) This code will be valid for minimum transaction Rs. 500.
6) Single code for all users.
7) This code has to be used in a single transaction.
8) Code is not applicable on any other category.
9) All issues/queries/complaints/grievances relating to the offer, if any, shall be addressed to customer care @ +91 120 306 2244.
10) Applicable on Paytm Web/Mobile App/wallet app.
11) Paytm reserves the right to amend/modify /change/add or terminate the terms contained herein at their sole description or discontinue the offer without any further notice.
12) The Cashback offer is non – transferable, non-binding and non-encashable.
13) Cashback will be credited in Paytm wallet within 24 to 48 hours of the loading.

Labels:

Complete A Survey And Get Rs 30 Paytm Cash For Free [Loot]

Complete A Survey And Get Rs 30 Paytm Cash For Free [Loot]

Want to get paytm cash for free ? Then here is your chance to get it. Complete a survey and get Rs 30 paytm cash for free. This is an amazing offer. You will be asked questions about companies like Ola cab, Uber, Taxi for sure and Meru cab. This will take just 2 minutes and you will get Rs 30 paytm cash.

How To Complete A Survey And Get Rs 30 Paytm Cash For Free :

1. Go to Offer Page
2. Start answering questions
3. Complete the survey
4. At last you will be asked to enter your mobile number and email
5. Enter your mobile number and email registered with paytm and click on Submit.
6. That’s it. You will get paytm coupon code within 48 hours.
7. Now go to Paytm Website
8. Login or singup
9. Initate adding Rs Rs 30 in wallet
10. Apply coupon code you received
11. Complete your transactions.
That’s it. Your paytm wallet will be credited with Rs 30 instantly.
Limited period offer.

Labels:

24 February, 2016

Get Rs 500 PVR Cinema Gift Voucher For Rs 173

Get Rs 500 PVR Cinema Gift Voucher For Rs 173

Nearbuy PVR Cinema Offer – Nearbuy is offering huge discount on purchase of PVR cinema voucher. Get Rs 500 PVR Cinema gift voucher for Rs 173. This is an amazing offer from nearbuy. Offer is valid for new users only and offer can be used only once. Old users will get PVR cinema gift voucher for Rs 345.

Get Rs 500 PVR Cinema Gift Voucher For Rs 173

How To Avail Nearbuy PVR Cinema Offer :

1) Go to Offer Page
2) Create new account
3) Select quantity ‘1’
4) Click on Buy
5) Proceed and apply promo code – YLE5OC
6) Pay Rs 173 and Complete your transaction.
That’s it. You will get Rs 500 PVR cinema gift coupon for just Rs 173. Offer is valid for new users. Old users will get it for Rs 345.

Terms & Conditions :-
1) Not valid on PVR Directors Cut & PVR Opulent mall
2) Voucher once sold cannot be refunded and the validity cannot be extended under any circumstances
3) Limited offer to purchase PVR movie tickets for nearbuy customers only
4) nearbuy shall only be responsible for the risk and consequences connected with the purchase amount of the voucher and not for the quality & merchantability of the services mentioned in the Voucher
5) All the terms and conditions as mentioned at pvrcinemas.com shall be applicable and binding on the customers
6) All the disputes in connection with the offer to the User/ customer shall be governed by & construed in accordance with the applicable laws in India. Any dispute including any dispute arising out of all matters with respect to the contest are subject to the jurisdiction of the Courts at Delhi only
7) Cannot be used for Off-line purchases at PVR’s Box Office
8) Not Valid On F&B Vouchers
9) Prior appointment mandatory (Upon purchase, you will receive a voucher with the reservation number)
10) Voucher printout is not mandatory for purchases done on nearbuy app and web
Limited period offer. Hurry !!

Labels:

23 February, 2016

JaldiRecharge Rs 10 Cashback On Rs 10 Recharge

JaldiRecharge Rs 10 Cashback On Rs 10 Recharge

JaldiRecharge Offer – Get Rs 10 cashback on Rs 10 Recharge.  This is an amazing offer. You will get 100% cashback on your recharge. Offer is valid for new users only. Offer can be used once by a user.


How To Get Rs 10 Cashback On Rs 10 Recharge At Jaldi Recharge :

1) Go to Offer Page
2) Create new account
2) Initiate your recharge
3) Proceed and apply promo code :-
FREE10
4) Pay the amount and complete your transaction.
You will get Rs 10 cashback in your JR wallet.

Terms & Conditions :
 
1) Get Rs.10/- free on Recharges Rs.10/- and above.
2) Code can be used once per user.
3) Instant Cashback will be credited into user’s JR Wallet.
4) Valid for new users.
5) Valid on web & app.
6) We reserve the right to end any or all offers at our discretion without any prior notice.

Labels:

Flygrades Get Rs 50 Paytm Cash For Referring 5 Friends

Flygrades Get Rs 50 Paytm Cash For Referring 5 Friends

Flygrades is back with a new refer and earn offer with paytm. Previously they are offering flipkart vouchers for referring friends. Now get Rs 50 paytm cash for referring 5 friends. You can earn unlimited paytm cash by referring friends. 


How To Get Rs 50 Paytm Cash For Referring 5 Friends In Flygrades :

1. Download Flygrades App From Here
2. Open the app
3. Login using gmail or facebook account
4. Enter your details 
5. That’s it. Your account will be credited with 100 points within 24 hours.
6. Now click on Menu > Refer and earn > Copy your referral link.
7. Share referral code wirh your friends and you will get Rs 50 paytm cash for referring 5 friends.
Points :-
=> Refer 5 Friends = Rs 50 paytm cash i.e. 1200 points
=> Refer 15 Friends = Rs 150 Paytm cash i.e. 3000 points.

Labels:

Exclusively 2016 opera mini 7.6.2 moded for android airtel

Exclusively 2016 opera mini 7.6.2 moded for android airtel

After a Long time Presnting opera mini 7.6.2 with ip Airtelgurus.com moded..;) ..so...grab it and enjoy..:)

Just Create following setting in your Mobile..


Proxy :- 37.228.107.253


Port :- 80


Apn :- airtelgprs.com


http://www.datafilehost.com/d/aa5edfe7


Note :- You are all familiar with sim blocking so..use at on your risk..:)

Dont Forget To Comment Guyz 

Labels:

How To Use AllDebrid And Other Premium Cookies

How To Use AllDebrid And Other Premium Cookies

First of all you need a browser that supports Cookie Editor/Manager add-ons. You will need Google Chrome or Mozilla Firefox. Second, you have to download a Cookie Editor/Manager add-on. 

How To Use Premium Cookies Go HereClick Here

How To Use AllDebrid And Other Premium Cookies


For Mozilla Firefox use Cookies Manager +:

This is an advanced cookie manager for Mozilla Firefox, read this FAQ carefully to understand how to use it. 

Releted: AllDebrid Premium 5 Day Cookie Updated Account 2015


For Google Chrome use Cookie Manager:

This is an advanced cookie manager for Google Chrome, read this FAQ carefully to understand how to use it. 

Releted: ByteBX Premium Account


Or use Premium Cookie Injector:

This one is very basic but easy to use, recommended if you don't have any experience managing cookies or sessions. It supports most filehosters. 

Step 1:

Download and open Multi Cookie Generator or use Multi Cookie Generator Online. 

Step 2:

Use Multi Cookie Generator (Online) to generate a cookie and copy it. This cookie contains a session key or identifier referring to a premium account from the database. 

Step 3:


Mozilla Firefox (Add-on: Cookies Manager+):

Open Firefox and go to Tools -> Cookies Manager+
The Cookies Manager+ window should open. Enter the filehosters URL in the search box (e.g.: filesonic.com). You will get a list of all cookies belonging to this host. Now you have to get the cookie name from the table below. This table contains a list of the cookie names the filehosters use for their cookies. 

If the cookie already exists ->
Select it and click the edit button. Now change the cookie content to the value you got from MCG in step 2. Hit save, close, and you're done. Go to the filehosters page and you should be signed in. 

If the cookie doesn't exist yet ->
You will have to create it yourself. Click 'add'. The cookie name is the name you got from the table. The content is the value you got from MCG in step 2. The domain is a dot, followed by the filehosters domain (e.g.: .filesonic.com) without www or any subdomain in front of it. The path is just a forward slash '/'. Hit save, close, and you're done. Go to the filehosters page and you should be signed in. 


Google Chrome (Add-on: Cookie Manager):

Open Google Chrome. Go to the filehosters website. After installing the extension you should see a cookie button on the toolbar (on the right). Click it. You will get a list of all cookies belonging to this host. Now you have to get the cookie name from the table below. This table contains a list of the cookie names the filehosters use for their cookies. 

If the cookie already exists ->
Select it. Now change the cookie value to the value you got from MCG in step 2. Hit save and you're done. Refresh the page and you should be signed in. 

If the cookie doesn't exist yet ->
You will have to create it yourself. Click 'add new cookie'. The cookie name is the name you got from the table. The value is the value you got from MCG in step 2. The domain is a dot, followed by the filehosters domain (e.g.: .filesonic.com) without www or any subdomain in front of it. The path is just a forward slash '/'. Hit save, and you're done. Refresh the page and you should be signed in. 


Google Chrome (Add-on: Premium Cookie Injector):

Open Google Chrome. Go to the filehosters website. After installing the extension you should see a cookie button on the toolbar (on the right). Click it. You will get a simple box where you can enter the cookie value. Enter the value you got from MCG in step 2. Click 'Inject cookie' and you're done. The page will refresh automatically and you should be signed in.

Labels:

Bytebx Premium Cookie and all premium account Updated 2016

ByteBx, Rapidgator Premium Account Account Working 2016

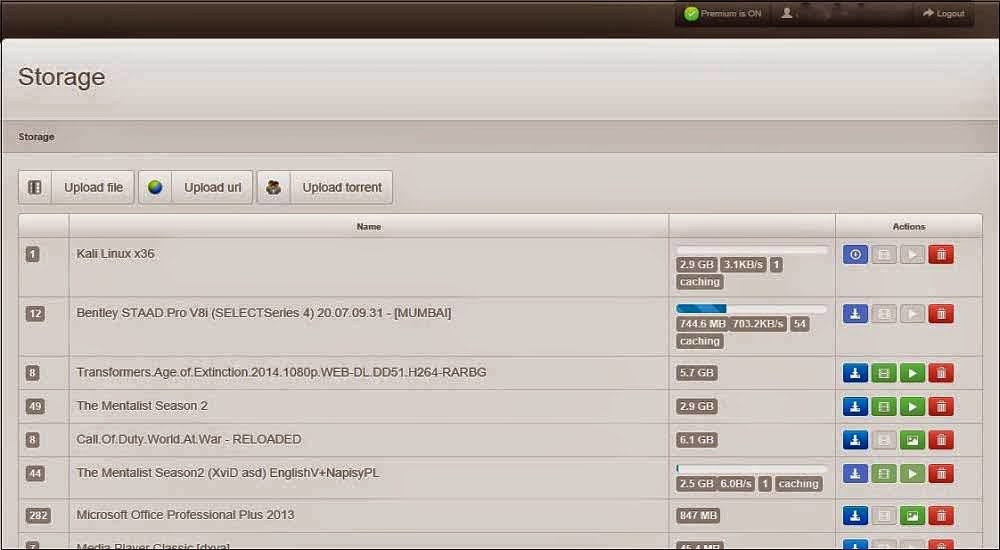
All Debrid,Zavera, Rapidgator, ByteBx and other Premium Cookie and Premium Account Use Many People Want To Download Torrents and other Files Using Internet Download Manager For Its Great Speed. There Are Many Sites Like - zbigz.com, bytebx.com etc. Help You To Download Torrents File Using Your Download Manager. But There Was Limit To Download Torrents File In Free Membership. So This Time CoderTrick Give You Premium Account For Downloading Your Unlimited Memory Torrents Files With Unlimited Speed. Like Us On Facebook For Stay Updated.


AllDebrid Premium Cookie and all premium account Updated 2015 

AllDebrid Premium Cookie and all premium account Updated 2015


Rapidgator And More Premium Account: 


All Debrid Premium Account: 


Founder: Bytebx Premium Account By - CoderTrick.

Features Of ByteBX Premium Account :
Premium Features Of ByteBX
Download Unlimited Memory Of Torrents
High Speed Download
Resume Download Support
Open And Add File - In It
Download With IDM


[Updated] Download ByteBX Premium Account From Bellow: [Working]


Note : After Successfully Download Your Torrent File Please Remove It From Premium Account.

Update : Premium Account Update 2016.

How To Use :
1. Download Premium Account From Given Link
2. Now Open - www.bytebx.com And Then SignIn With Premium Account.
3. Then Click On Upload Torrent And Upload Your Torrent File Or Magnet Url.
4. Your Torrent File Added On The List. 
5. After Caching Finished You Can Download Your File.

Labels:

16 February, 2016

FreeCharge Get Rs 50 Cashback on Rs 50 (new users)

FreeCharge Get Rs 50 Cashback on Rs 50 (new users)

Freecharge is again offering Rs 50 Cashback on Rs 50 or above Recharge at Freecharge App, Offer is valid maximum 1 time/new user/debit/credit card, Offer is Valid for New Freecharge users only. How to get Rs 50 Cashback on Rs 50, Just follow the Steps below:


Freecharge Offer : Get Rs 50 Cashback On Recharge Of Rs 50


How to get Rs 50 cashback on Rs 50 on freecharge:-

Steps:-
1) Firstly goto Freecharge site or Download Freecharge app
2) Register a New account on Freecharge.
3) Now Initiate a Recharge of Rs 50 or More.
4) On next page click “Skip & Pay”
5) Apply Coupon:- HIFC
6) Once your Coupon is applied successfully then Complete your Payment using debit/credit card. Once your Recharge is Successful, You will get the Rs 50 Cashback to your Freecharge wallet instantly, You can use this Cashback for next Mobile recharge & Bill Payments.

Terms & Conditions:-

  • Valid on successful Recharges & Bill payments donedone. 24-February 2016.
  • Valid once for New users only
  • Valid on minimum recharge of Rs.50. Flat cashback of Rs. 50
  • HIFC promocode has to be applied to avail cashback offer
  • Valid on Credit Card/Debit Card
  • Cashback will be credited to your FreeCharge Wallet which can be redeemed within 185 days from date of credit, and is non transferable
  • Not Valid for transactions done via FreeCharge Balance
  • Offer not valid for Airtel transactions

Labels:

15 February, 2016

How to install Ubuntu on VPS and access remotely

First of all I am going to show you how to install Ubuntu OS on VPS and run XFCE Desktop Environment on it.

Let's start with Control Panel. I currently have this VPS.

[Image: Xn2W5l.jpg]

To access the Console press the Serial Console button. After enabling java you will get something like this.

[Image: w73pgl.jpg]


So just paste the root password and press OK.
So now you are in the server's console and you can type in it these commands. You can type commands with or without sudo since you are logged in as root but I will type it like this. Each time you are prompted with question to type Y for yes or N for no type Y of course.

Code:
sudo apt-get update

Code:
sudo apt-get upgrade

Code:
sudo apt-get install xfce4

With this we have installed XFCE Desktop Environment.

For GNOME installation the code is:

Code:
sudo apt-get install ubuntu-desktop

And for KDE the code is:

Code:
sudo apt-get install kubuntu-desktop

But in order to connect the server remotely we need VNC server installed so just type this command (there is no need to download anything):

Code:
sudo apt-get install vnc4server

And follow the instructions.

The next step is to create new user and give it sudo rights. We will name it normaluser and give it password (something easy to remember). I did it like this but there could be different ways of doing it.

Code:
adduser normaluser

When prompted for password type in password.

Code:
sudo adduser normaluser sudo

And with this normaluser has sudo rights.

Next step is to download program called Putty and put it on your Desktop of Windows computer. You will find it here .
Next step is to open Putty, paste the server's IP, make sure SSH is marked and click Open. It looks like this.

[Image: 4putty.jpg]

Now using putty we have a console from which we can change settings on our VPS. I am not sure about this (since I didn't check it 100%) but it seams that you can't connect as root on Ubuntu/Debian using Putty. So that is the main reason why I created new user and added it sudo rights.

So when Putty prompts for user you will type normaluser and enter correct password for normaluser (not root)
Now here comes the tricky part (just a little bit tricky) . In order to access remotely VPS and get proper Desktop Environment we have to do this. First open Putty again (if you closed it open again and log in as normaluser) and type this command.

Code:
vi /home/normaluser/.vnc/xstartup

This will open text editor vi and open the file xstartup. Then press the Insert key on your Keyboard and you are ready to edit the file. Hold down Delete key on Keyboard until you delete everything.
The next step is to copy this code, then open Putty again and right click on the top left corner. With that you will paste the code inside the xstartup file using Putty. This is the code you need to copy and paste.

Code:
#!/bin/sh

# Uncomment the following two lines for normal desktop:

# unset SESSION_MANAGER

# exec /etc/X11/xinit/xinitrc

[ -x /etc/vnc/xstartup ] && exec /etc/vnc/xstartup

[ -r $HOME/.Xresources ] && xrdb $HOME/.Xresources

xsetroot -solid grey

vncconfig -iconic &

xterm -geometry 80×24+10+10 -ls -title “$VNCDESKTOP Desktop” &

startxfce4 &

# twm &

For GNOME xstartup you paste:
Code:
#!/bin/sh

# Uncomment the following two lines for normal desktop:

# unset SESSION_MANAGER

# exec /etc/X11/xinit/xinitrc

[ -x /etc/vnc/xstartup ] && exec /etc/vnc/xstartup

[ -r $HOME/.Xresources ] && xrdb $HOME/.Xresources

xsetroot -solid grey

vncconfig -iconic &

xterm -geometry 80×24+10+10 -ls -title “$VNCDESKTOP Desktop” &

startx

And for KDE the xstartup file looks like :
Code:
#!/bin/sh

# Uncomment the following two lines for normal desktop:

# unset SESSION_MANAGER

# exec /etc/X11/xinit/xinitrc

[ -x /etc/vnc/xstartup ] && exec /etc/vnc/xstartup

[ -r $HOME/.Xresources ] && xrdb $HOME/.Xresources

xsetroot -solid grey

vncconfig -iconic &

xterm -geometry 80×24+10+10 -ls -title “$VNCDESKTOP Desktop” &

startkde

Since I couldn't run GNOME or KDE on my VPS I will not post Screen Shots of it running. But when I tried to connect remotely I did get message that there is not enough hardware to run GNOME and proper Close button on my VNC screen. I think that means it works.

After that you should press Esc key on Keyboard and if you did everything properly it looks like this.

[Image: LUfCpl.jpg]

To save the file type this in Putty and hit Enter.

Code:
:x

OK, so we are almost there. Next step is to run vncserver with this command.

Code:
vncserver :3000

And server is up and running on VPS. Next step is to connect it remotely via TightVNC. You can download it from here . Just install the .exe file and run TightVNC Viewer.
When you run the viewer it looks like this.

[Image: 9FbnCl.jpg]

The important part is to put server's address in this form XX:XX:XX:XX:8900 so it will connect using port 8900.
If we had typed this command

Code:
vncserver :1

Then the port would be 5901. What ever you type instead of number 1 the port will be changed into 5900 + that number . In my case I typed 3000 and the port is 8900 (5900+3000).

So when you hit Connect the Screen opens and it looks like this.

[Image: NGCvcl.jpg]

So we have classic Linux Terminal and we are almost there. Just type this command in the terminal.

Code:
startxfce4

And it will start so you will get this picture.

[Image: VXoZGl.jpg]

Weather you want to hit Close or click on Next it's up to you but once everything is finished XFCE looks like this.

[Image: jcUZul.jpg]


So there you have it. XFCE on your VPS. For Debian I think the procedure is almost the same and for Centos there are some command line differences (apt-get becomes yum) . I will see about setting up GNOME and KDE some time later and make a tutorial about that too.

Edit: I've added GNOME and KDE.

This is how the GNOME session looks like. Even on VPS such as VPS3 it was possible to run it.

[Image: oK7Uhl.jpg]

Labels:

14 February, 2016

Airtel Free 3g Internet Udp Trick For TAMILNADU 2015

2014-11-16-17-28-08-12134788.png


Download PD Proxy

FREE PD PROXY DOWNLOD 

Ports for Airtel

UDP- 9201

LPort- 0

First Normally Connect Internet with airtelgprs.com

then Connect PD Proxy with the given Ports.

It will be connected instantly

Enjoy!

Labels:

Aircel Free Data Offer 100 MB data for Downloading App

Aircel Free Data Offer 100 MB data for Downloading App

Aircel offer – Get Free 100 MB data for Downloading Aircel App, This offer is available for Limited time only. Aircel App also show Pop-up window comes when you successfully register it on aircel app. This data is valid for 3 days. How to get.? Just follow the Steps below:

image


How to Get Free 100 MB data from Aircel App:-

Steps:

1) Firstly Download Aircel App Here
2) Install & open the Aircel App.
3) Register on Aircel App.
4) A pop-up Pop-up will appear on app you have successfully register it on aircel app.
5) 100 MB get credited to your Aircel sim shortly which is valid for 3 days.

Labels: